|
This section explores additional tasks that are available in the Scheduler. This can include accessing appointments lists and patient recalls, updating patient photos, as well as managing sticky notes, printing items from the Scheduler, and using the Operatory Monitor.
 Manage Scheduler Lists Manage Scheduler Lists
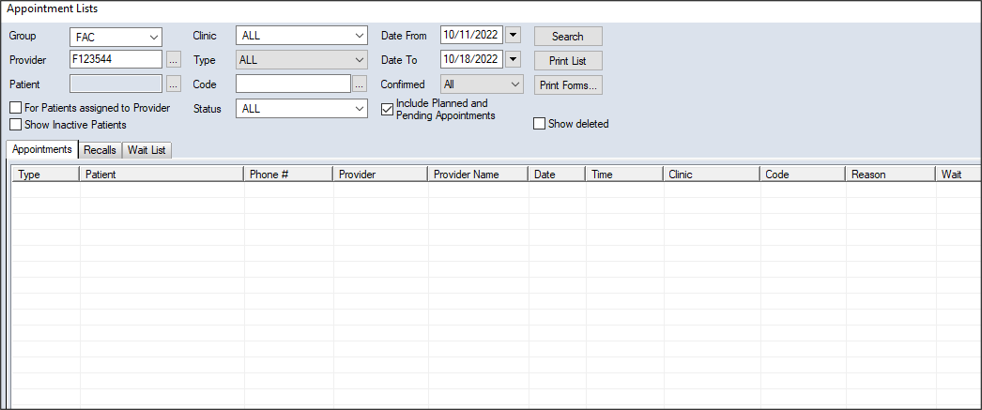
The Appointment Lists window offers three tabs to allow you to easily manage patient appointments, including recall reminders and wait listed appointments:
-
Appointments tab: Allows you to search for appointments matching the criteria specified. Once found, you can perform a variety of other tasks related to appointments that include scheduling, modifying, and adding notes and treatments, etc.
-
Recalls tab: Allows you to search for recall reminders matching the criteria specified. Once found, you can perform several tasks that include modifying recall reminders and requesting or creating appointments for a recall reminder.
Important: Recall reminders are not considered appointments.
Some institutions may configure axiUm to group together recall reminders from various classifications when they occur within a specific time.
Example: If a patient has a recall reminder for a hygiene appointment on June 6, and a recall for an endo procedure on June 15, you can book the two recall reminders in the same appointment, eliminating the need for multiple visits by the patient.
Note: Grouped recall reminders in an appointment display a recall chain icon.
-
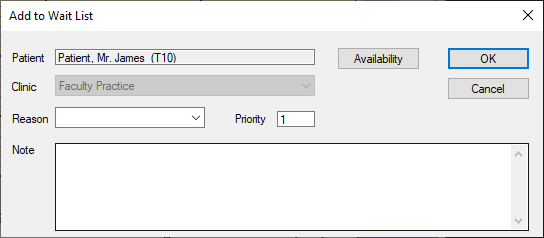
Wait List tab: Allows you to search for waitlisted appointments matching the criteria specified. Once found, you can perform a variety of other tasks related to waitlisted appointments that include scheduling, modifying, and adding notes and treatments, etc.
Tip: You can also open the Wait List tab directly from the Active tab to fill an open appointment time using the wait list.
To manage Scheduler lists:
-
Open the Scheduler module and click the Lists ( ) icon to display the Appointment Lists window. ) icon to display the Appointment Lists window.
-
Click the Appointments, Recalls, or Wait List tab as necessary.
-
Search for appointments, recalls, or waitlisted appointments.
-
Complete the fields as necessary and click Search.
Appointment Lists Fields
Note: Some fields are only available from specific tabs.
| Group |
Select a provider group from the drop-down list.
|
| Provider |
Click the ellipsis to display the Providers List window and select a provider.
|
| Patient |
Note: This field only displays if the Appointments or Recalls tab is selected.
Click the ellipsis to display the Select Patient window and select a patient.
|
|
Clinic |
Select a clinic or ALL from the drop-down list.
Note: This drop-down list is disabled if you are using the Wait List tab in Appointment Fill mode.
|
| Type |
Select the appointment type from the drop-down list.
Note: The options in the list are hard-coded and cannot be changed.
|
| Code |
Note: This field only displays if the Appointments or Recalls tab is selected.
Click the ellipsis to display the Appointment Code or Recall Codes window and select an appointment or recall reminder code.
|
| Reason |
Note: This field only displays if the Wait List tab is selected.
Select a wait reason from the drop-down list.
|
| Status |
Note: This field only displays if the Appointments or Recalls tab is selected.
Select an appointment status from the drop-down list.
|
| Priority |
Note: This field only displays if the Wait List tab is selected.
This field is used for internal purposes and indicates a numeric ranking of an appointment’s importance that can be used to make cancellation decisions when chairs are limited.
It defaults to the value indicated in the Wait List Reasons window > Default Priority field.
|
| For Patients assigned to Provider |
Note: This field only displays if the Appointments or Recalls tab is selected and is only enabled if the Provider field displays a provider.
Select the checkbox to indicate that only records with patients assigned to the selected provider will be included in the search.
|
| Show Inactive Patients |
Select the checkbox to include inactive patients in the search.
|
| Date From / Date To |
Note: These fields only display if the Appointments or Recalls tab is selected.
Select the start/end dates of a date range from the drop-down calendar.
|
| Confirmed |
Note: This field only displays if the Appointments or Recalls tab is selected.
Select a confirmation status from the drop-down list.
Note: The options in the list are hard-coded and cannot be changed.
|
| Include Planned and Pending Appointments |
Note: This field only displays if the Appointments tab is selected.
Select the checkbox to include planned and pending appointments in the search.
|
| Show Only Active |
Note: This field only displays if the Recalls tab is selected.
Select the checkbox to include only active appointments in the search.
|
| Show deleted |
Note: This field only displays if the Appointments or Recalls tab is selected.
Select the checkbox to include deleted appointments in the search.
|
| Show grouped |
Note: This field only displays if the Recalls tab is selected.
Select the checkbox to include grouped recalls in the search.
|
-
Review the list and complete any of the following to work with the appointment or recall as necessary.
Appointments Tab Tasks
Select Patients
-
Right-click an appointment and select Select Patient.
Note: This selects the patient for all of axiUm. For more ways to select patients, see Select Patients.
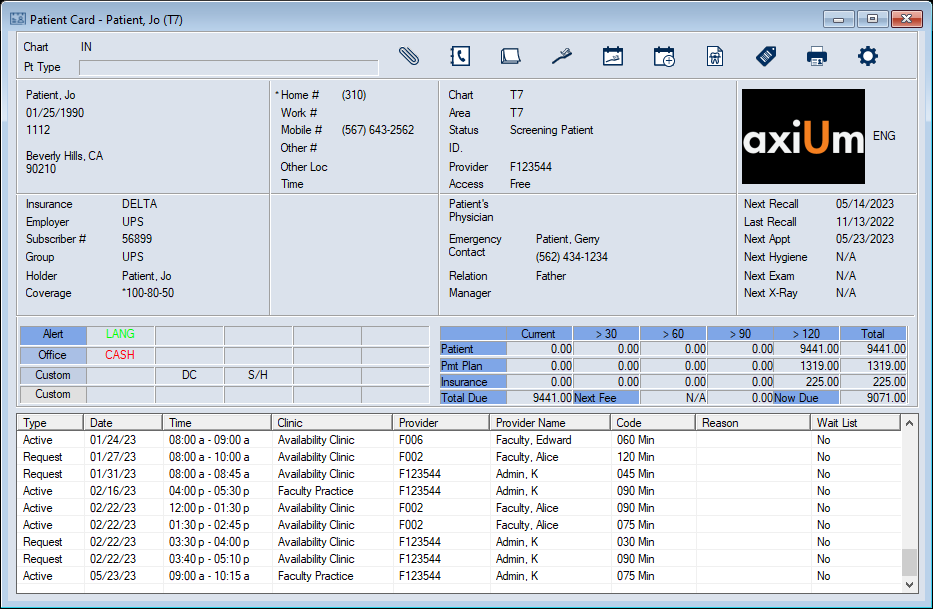
View the Patient Card
-
Right-click an appointment and select Patient Card… to display the Patient Card window.
Tip: In some places, the right-click option displays as Patient Card.
-
Review as necessary.
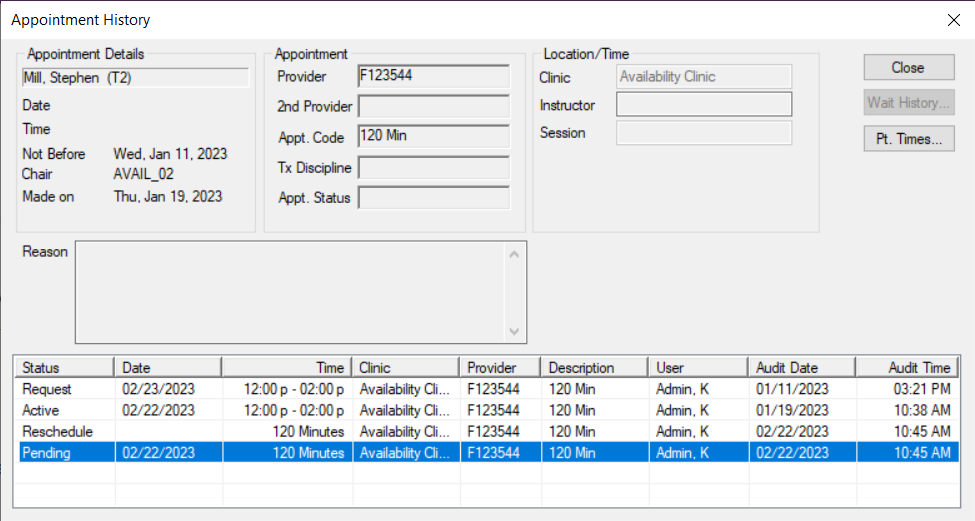
View Appointment History
-
Right-click an appointment and select Show History to display the Appointment History window.
-
Select a listed record and review the information as necessary.
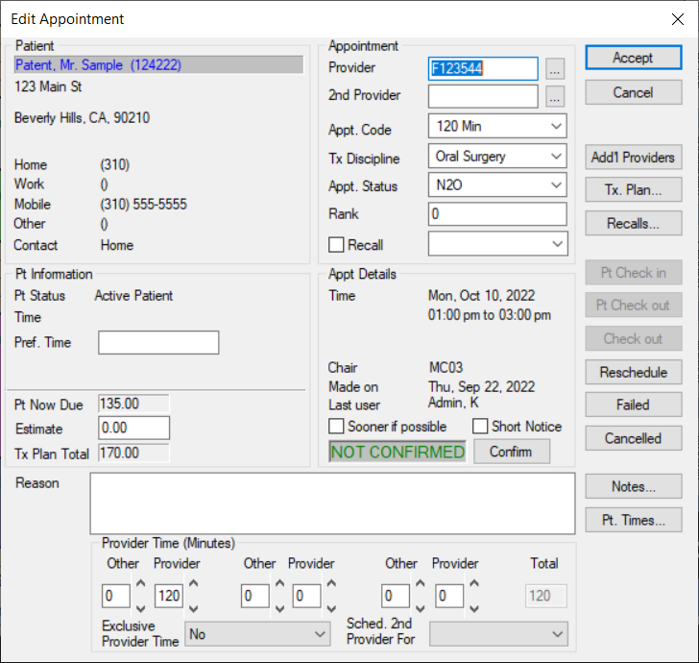
Schedule Appointments
-
Right-click an appointment and select Schedule to display as a yellow floating appointment and drag to an open spot in the schedule.
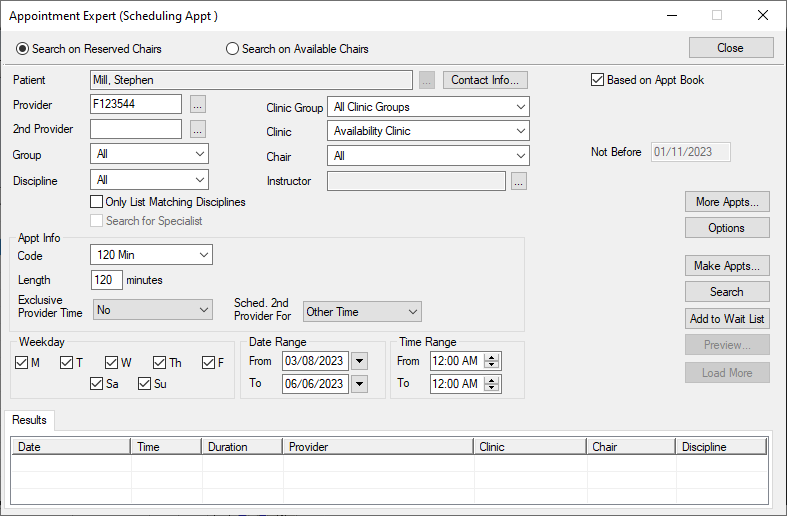
Schedule with Appointment Expert
The Appointment Expert allows you to search for available times in the Scheduler and book appointments.
-
Right-click an appointment and select Schedule with Expert… to display the Appointment Expert (Scheduling Appt) window.
-
Complete the fields as necessary and click Search.
- Review the listed entries.
-
Select a listed appointment date/time and click Make Appts….
-
Click and drag the yellow floating appointment to the empty time block in the Active tab and double-click the area.
Change to Appointment Request
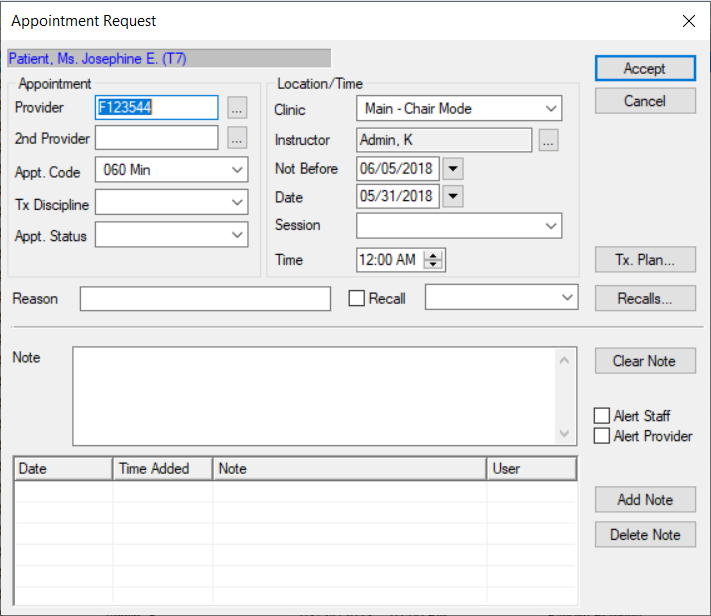
When necessary, you can change a planned appointment into an appointment request.
-
Right-click an appointment and select Change to Request to display the Appointment Request window.
-
Complete the fields as necessary and click OK.
Sign In/Check In Patients
-
Complete any of the following:
-
To sign in a patient and display the Patient Arrival report, right-click an appointment and select Patient Sign In.
The patient’s name displays in purple text to indicate they are signed in and a blue Patient Arrival indicator displays on the provider’s status bar:
-
To check in a patient and display the Patient Check In Form, right-click an appointment and select Patient Check In.
The patient’s name displays in red text to indicate they are checked in to a clinic.
Check Out Patients
-
Right-click an appointment and select Patient Check Out.
The patient’s name displays in the Scheduler in gray text to indicate they are checked out of the clinic.
Tip: If checked out by mistake, right-click the appointment and select Undo Patient Check Out.
Seat Patients
-
Right-click an appointment and select Patient Seated to set the appointment status to patient seated.
The appointment text displays in black text to indicate the patient is seated in the clinic.
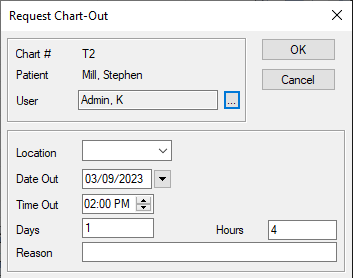
Request Charts
Chart requests control access to paper charts so only one person may use a chart at one time. In most cases, an automatic chart request is sent when the appointment is scheduled, but you can make manual chart requests when necessary.
-
Right-click an appointment and select Chart Request to display the Request Chart-Out window.
Note: If the patient has an electronic chart, a prompt displays. Click Yes to display the Request Chart-Out window.
-
Record the time, location, and reason needed and click OK.
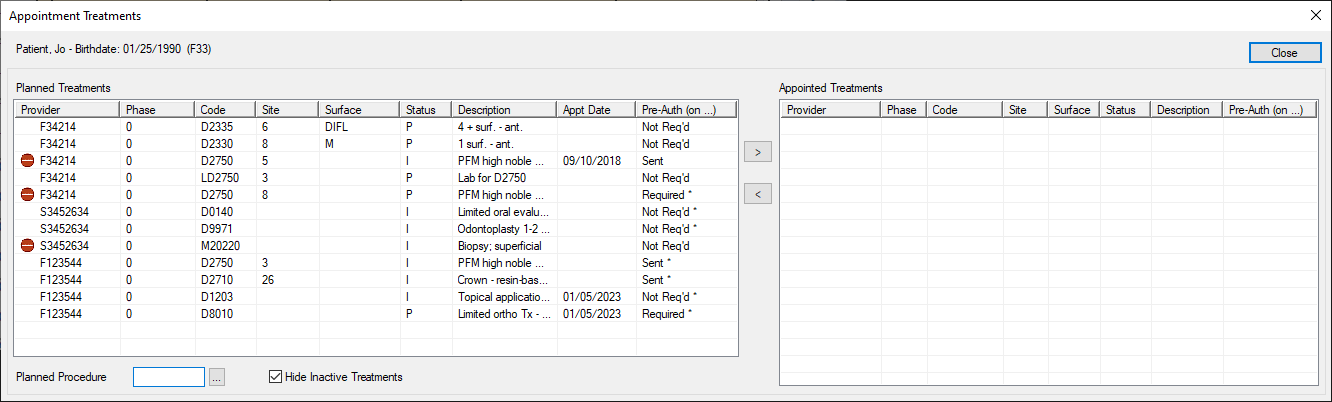
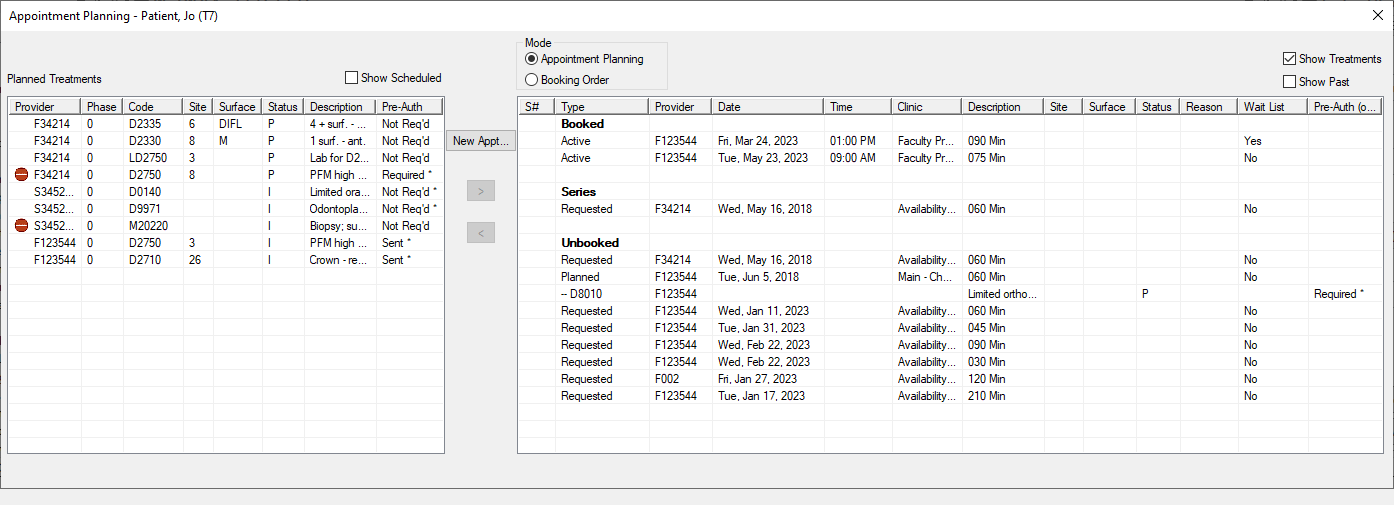
Add Planned Treatments to Appointments
-
Right-click an appointment and select Appointment Treatments to display the Appointment Treatments window.
Note: Only approved planned treatments display.
-
To add planned treatment(s) to the appointment, select the listed treatment(s) and click the > button to move to the Appointed Treatments pane.
-
Click Close.
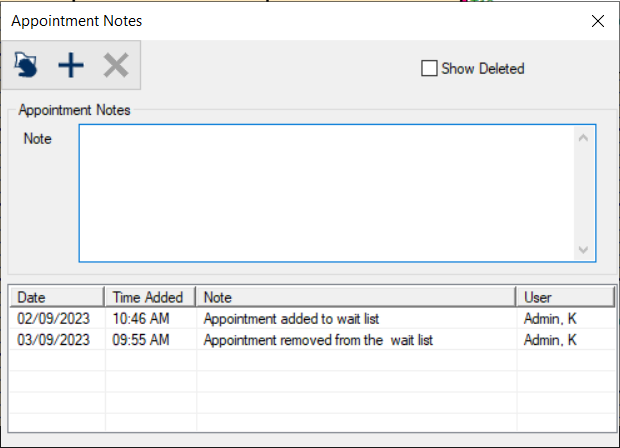
Manage Appointment Notes
-
Right-click an appointment and select Notes to display the Appointment Notes window.
-
To add a note, enter the note text and click the Add a new Record ( ) icon. ) icon.
-
To delete a note, select a listed note and click the Delete Record ( ) icon. ) icon.
Reschedule Appointments
-
Right-click an appointment and select Reschedule to display as a yellow floating appointment and drag to an open spot in the schedule.
Confirm Appointments
-
After contacting the patient, right-click the appointment and select Confirm.
The appointment text displays in blue to indicate that the appointment is confirmed.
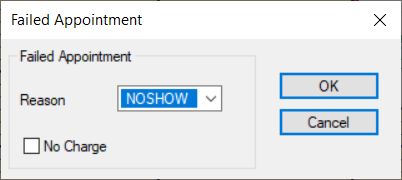
Fail Appointments
An appointment can be failed when the patient does not arrive for the appointment and did not provide cancellation notice.
-
Right-click an appointment and select Fail to display the Failed Appointment window.
-
Complete the fields as necessary and click OK.
Delete Appointments
In rare cases, you may need to delete an appointment.
Important: There are many other ways to modify inaccurate appointments. Whenever possible, we recommend you edit or cancel the appointment as necessary.
-
Right-click an appointment and select Delete.
-
When prompted, click Yes to confirm your deletion.
Edit X-Ray Info
X-ray technicians often need to add details about x-rays taken for the selected patient. Other providers can view those x-rays and details.
-
Right-click an appointment and select Edit X-Ray Info to display the X-Ray Information window.
Note: This option is only enabled if the appointment is a hygiene type appointment code.
Tip: The window only displays if the appointment is today or a future date. The window cannot display if the appointment is past and the X-Rays Taken checkbox is deselected.
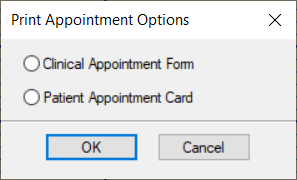
Print Appointment Forms
-
Right-click an appointment and select Print Appt Form to display the Print Appointment Options window.
Tip: You can also click the Print Forms... button to display the Print Appointment Options window.
-
Select one of the following and click OK:
Recalls Tab Tasks
Book Recall Appointments
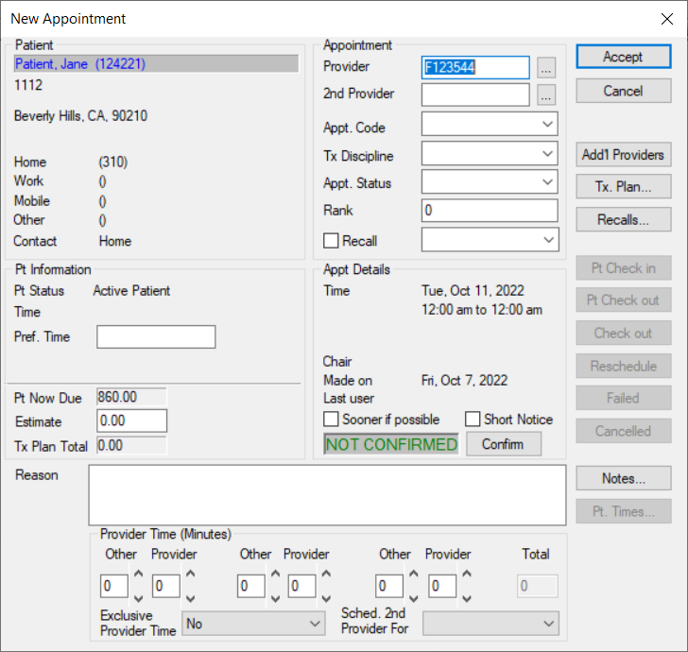
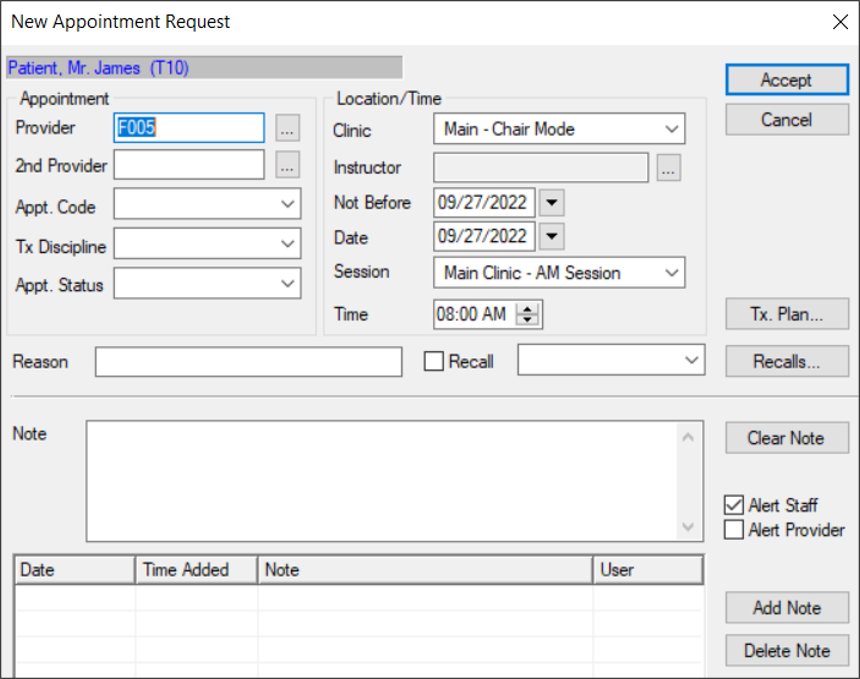
Depending on your institution's workflow, you can schedule an appointment from a recall reminder and associate the recall reminder directly with the appointment.
-
Right-click a recall reminder and select Make appointment… to display the New Appointment window.
Tip: You can also select grouped recalls.
-
Complete the fields as necessary and click Accept.
Tips:
-
The selected recall is automatically associated with the appointment and displays in the Recalls field.
-
To edit the recall information, click Recalls....
Select Patients
-
Right-click a recall reminder and select Select Patient.
Note: This selects the patient for all of axiUm. For more ways to select patients, see Select Patients.
View the Patient Card
-
Right-click a recall reminder and select Patient Card… to display the Patient Card window.
Tip: In some places, the right-click option displays as Patient Card.
-
Review as necessary.
View the Patient Info
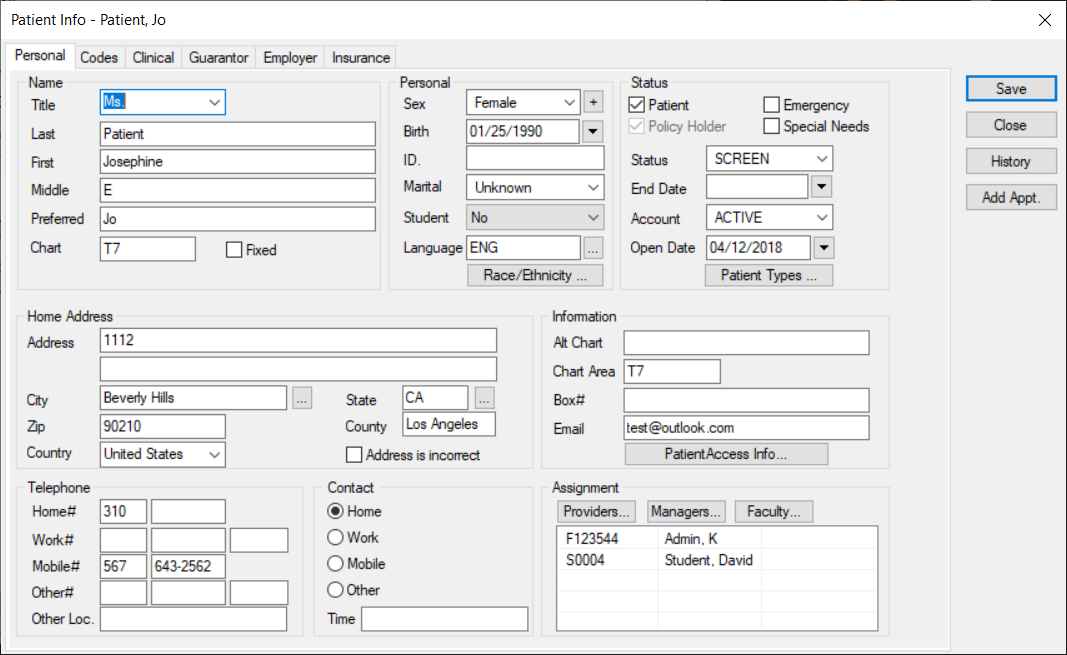
-
Right-click a recall reminder and select Patient Info… to display the Patient Info window.
-
Review as necessary.
Modify Recalls
-
Right-click a recall reminder and select Edit Recall… to display the Patient Recalls window.
-
Select the listed recall.
-
Modify the fields as necessary and click the Modify Record ( ) icon. ) icon.
Wait List Tab Tasks
Select Patients
-
Right-click an appointment and select Select Patient.
Note: This selects the patient for all of axiUm. For more ways to select patients, see Select Patients.
View Appointment History
-
Right-click an appointment and select Show History to display the Appointment History window.
-
Select a listed record and review the information as necessary.
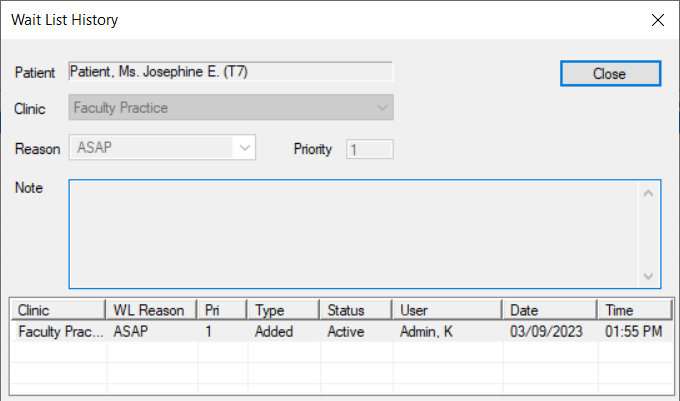
View Wait List History
-
Right-click an appointment and select Show Wait List History to display the Wait List History window.
-
Select a listed record and review the information as necessary.
View the Patient Card
-
Right-click an appointment and select Patient Card… to display the Patient Card window.
Tip: In some places, the right-click option displays as Patient Card.
-
Review as necessary.
Schedule Appointments
-
Right-click an appointment and select Schedule to display as a yellow floating appointment and drag to an open spot in the schedule.
Schedule with Appointment Expert
The Appointment Expert allows you to search for available times in the Scheduler and book appointments.
-
Right-click an appointment and select Schedule with Expert… to display the Appointment Expert (Scheduling Appt) window.
-
Complete the fields as necessary and click Search.
- Review the listed entries.
-
Select a listed appointment date/time and click Make Appts….
-
Click and drag the yellow floating appointment to the empty time block in the Active tab and double-click the area.
Change to Appointment Request
When necessary, you can change a planned appointment into an appointment request.
-
Right-click an appointment and select Change to Request to display the Appointment Request window.
-
Complete the fields as necessary and click OK.
Request Charts
Chart requests control access to paper charts so only one person may use a chart at one time. In most cases, an automatic chart request is sent when the appointment is scheduled, but you can make manual chart requests when necessary.
-
Right-click an appointment and select Chart Request to display the Request Chart-Out window.
Note: If the patient has an electronic chart, a prompt displays. Click Yes to display the Request Chart-Out window.
-
Record the time, location, and reason needed and click OK.
Add Planned Treatments to Appointments
-
Right-click an appointment and select Appointment Treatments to display the Appointment Treatments window.
Note: Only approved planned treatments display.
-
To add planned treatment(s) to the appointment, select the listed treatment(s) and click the > button to move to the Appointed Treatments pane.
-
Click Close.
Manage Appointment Notes
-
Right-click an appointment and select Notes to display the Appointment Notes window.
-
To add a note, enter the note text and click the Add a new Record () icon.
-
To delete a note, select a listed note and click the Delete Record () icon.
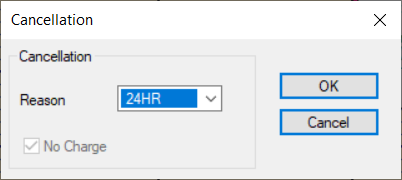
Cancel Appointments
-
Right-click an appointment and select Cancel to display the Cancellation window.
-
Complete the fields as necessary and click OK.
Tip: If cancelled by mistake, right-click the appointment and select Undo Cancel/Fail.
Fail Appointments
An appointment can be failed when the patient does not arrive for the appointment and did not provide cancellation notice.
-
Right-click an appointment and select Fail to display the Failed Appointment window.
-
Complete the fields as necessary and click OK.
Tip: If failed by mistake, right-click the appointment and select Undo Cancel/Fail.
Delete Appointments
In rare cases, you may need to delete an appointment.
Important: There are many other ways to modify inaccurate appointments. Whenever possible, we recommend you edit or cancel the appointment as necessary.
-
Right-click an appointment and select Delete.
-
When prompted, click Yes to confirm your deletion.
Print Appointment Forms
-
Right-click an appointment and select Print Appt Form to display the Print Appointment Options window.
Tip: You can also click the Print Forms... button to display the Print Appointment Options window.
-
Select one of the following and click OK:
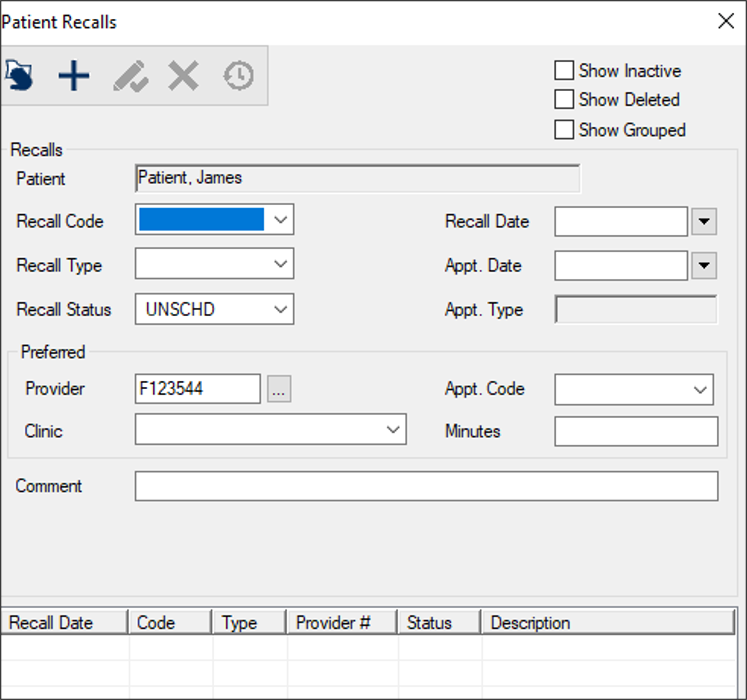
Manage Patient Recalls
A recall is an appointment reminder for a return visit by a patient and considered a separate entity from an appointment. Depending on how your institution has configured recalls, axiUm can prompt you to create a recall appointment reminder or can automatically create the recall appointment reminder on behalf of the provider after a procedure occurs that requires a recall. If necessary, you can also create reminders manually.
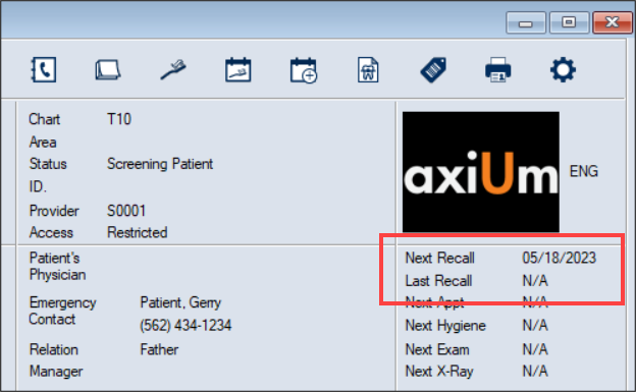
The Patient Recalls window allows you to create and manage recall appointment reminders for the selected patient. Once created, a recall appointment reminder displays the next recall date on the Patient Card window but does not automatically schedule an appointment. When ready to schedule an appointment for a patient with a recall, you can access the Patient Recalls window and select a listed recall appointment reminder to associate with the appointment.
Tip: To facilitate contacting the patient to schedule an appointment, you can use Info Manager to generate and send recall reminder letters to patients or you can contact the patients directly.
To manage patient recalls:
-
Open the Scheduler module to the Active or Pending tab and locate an appointment.
-
Right-click the appointment and select Patient Recalls to display the Patient Recalls window.
Tip: You can also access the Patient Recalls window from the New Appointment and Edit Appointment windows or through the Patients module.
Note: Depending on how your institution has configured recalls, some areas of the window may default according to the user.
-
Review the listed entries.
Tip: If necessary, select any of the following checkboxes:
-
Show Inactive: If selected, completed recalls are included in the list.
-
Show Deleted: If selected, deleted recalls are included in the list in gray text.
-
Show Grouped: If selected, grouped recalls are included in the list.
-
To perform another task, complete any of the following:
Add Patient Recalls
-
Click the Clear Data ( ) icon. ) icon.
- Complete the fields as necessary and click the Add a new Record () icon.
| Recall Code |
Recall codes indicate the length of time between the current date and the date a patient is due to return to the clinic.
Select a recall code from the drop-down list.
Once selected, axiUm calculates the date using the length of time and displays the recall date in the Recall Date field.
|
| Recall Type |
Select a recall type from the drop-down list.
Examples: HYG - Hygiene recall and PER - Periodontal recall.
|
| Recall Status |
Select a recall status from the drop-down list.
|
|
Recall Date |
axiUm auto-populates this field with the date the patient is expected to return for the recall if the Recall Code field is set.
If necessary, select another date from the drop-down calendar.
|
| Appt. Date |
This indicates the date of the actual recall appointment.
Note: If you scheduled a recall appointment for this patient from the Scheduler module, axiUm auto-populates and disables the field.
If necessary, select another date from the drop-down calendar.
|
| Appt. Type |
This read-only field indicates the status of the actual recall appointment.
Examples: Planned, Active, etc.
|
| Provider |
Click the ellipsis to display the Providers List window and select a provider.
|
| Clinic |
Select the clinic the recall should be scheduled in from the drop-down list.
|
| Appt. Code |
Select the appointment code that the recall appointment will be associated with from the drop-down list.
|
| Minutes |
Enter the number of minutes required for the recall appointment.
Tip: This will help you schedule the required length of time when scheduling this patient’s recall appointment.
|
| Comment |
Enter any additional information about this recall.
Example: If cancelling a recall, you can enter the cancellation reason for reporting purposes.
Note: If axiUm creates a recall as a result of a procedure, this field is auto-populated with a description.
|
Edit Patient Recalls
-
Select a listed entry.
-
Make any necessary changes and click the Modify Record () icon.
Delete Patient Recalls
-
Select a listed entry and click the Delete Record () icon.
-
When prompted to confirm your deletion, click Yes.
View Patient Recall History
-
Select a listed entry and click the Show History ( ) icon to display the Patient Recall History window. ) icon to display the Patient Recall History window.
-
Select a listed record and review the information as necessary.
Manage Patient Photos
You can add a patient photo to help identify the patient when they arrive at the clinic.
Tip: If a patient does not want a photo, upload a standard/stock image to indicate the patient declined.
Note: You can use TWAIN driver webcams, integrated webcams, and USB-connected webcams to capture patient and user photos in axiUm.
To manage patient photos:
- Select a patient and open the Scheduler.
- Double-click the stock/patient photo to display the Patient Picture window.
-
Review the Picture section and upload/capture a picture as necessary.
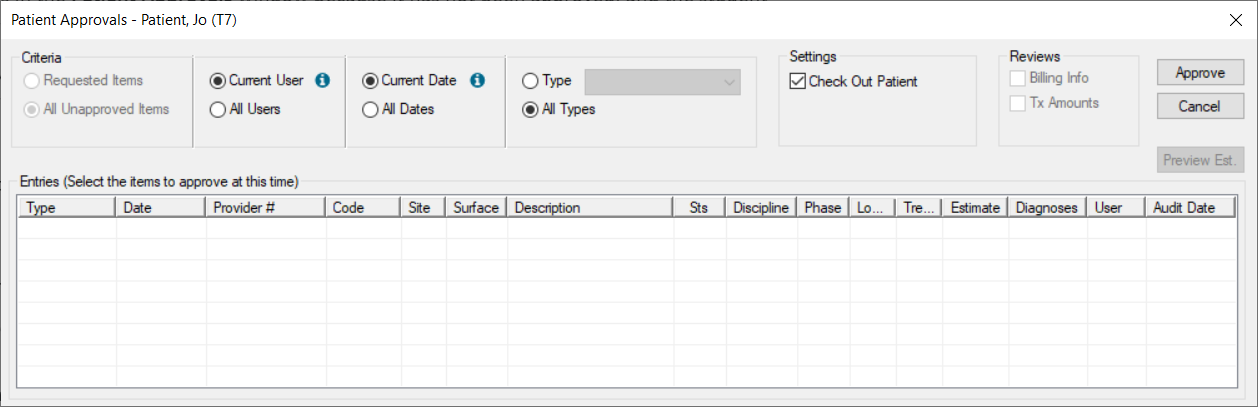
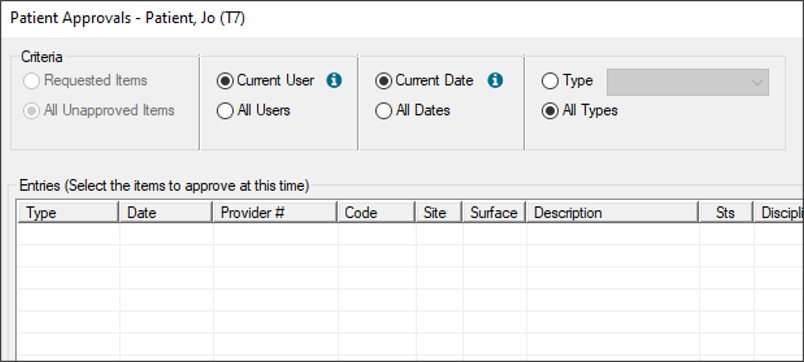
Access Patient Approvals
The Patient Approvals window is used to review and approve work done by student providers. It must be reviewed and approved by an instructor or faculty member.
While the Patient Approvals window is generally accessed via the patient’s chart number on the status bar, the window is also accessible through the Scheduler module.
To access Patient Approvals:
-
Open the Scheduler module to the Active or Pending tab and locate an appointment.
-
Right-click the appointment and select Patient Approvals to display the Patient Approvals window.
Note: When you first open the Patient Approvals window, the Criteria filters default based on the following:
-
For providers that require approval requests, the Requested Items radio button is selected. For all other users, the All Unapproved Items radio button is selected.
-
For providers, the Current User and All Dates radio buttons are selected. For non-providers, the All Users and All Dates radio buttons are selected.
-
Complete the approval as necessary.
Use Sticky Notes
Like the paper version, sticky notes are used to store and display small pieces of information and can serve as reminders for you or other users.
They can be added via the Note/Stickies ( ) icon and attached to different areas in the Scheduler. They may be dragged and attached to a book/clinic (top left), an appointment (middle), or as a general scheduler note that displays for all users (bottom right). ) icon and attached to different areas in the Scheduler. They may be dragged and attached to a book/clinic (top left), an appointment (middle), or as a general scheduler note that displays for all users (bottom right).
Notes:
-
When working in Book mode, sticky notes can be attached to the selected clinic when in the Chair tab, but can be attached to the selected book when in the Active tab.
-
When working in Chair mode, sticky notes can be attached to the selected clinic, regardless of whether you are in the Chair or Active tab.
Sticky notes display as small, numbered icons that indicate the number of notes waiting.
Use the Operatory Monitor
The Operatory Monitor allows you to track the status of appointments, follow patients through their clinical experience, and display alerts for staff and faculty when a provider needs assistance but must remain with the patient.
These alerts are controlled by clinical notification states set by providers from their workstations. Each state is color-coded and ranked according to urgency to provide information to faculty and staff and help them see where help is needed and prioritize, depending on the severity of the situation.
Tip: The alerts also display in FacultyAccess.
The Operatory Monitor can be used at the front desk to check in patients and monitor patient flow or be displayed in a central location to alert staff / faculty to critical needs and clinical progress.
Examples: In an academic environment, a student can update their status, indicating a need for approval. In a professional clinic, a hygienist can signal a need for a dentist to consult with a patient.
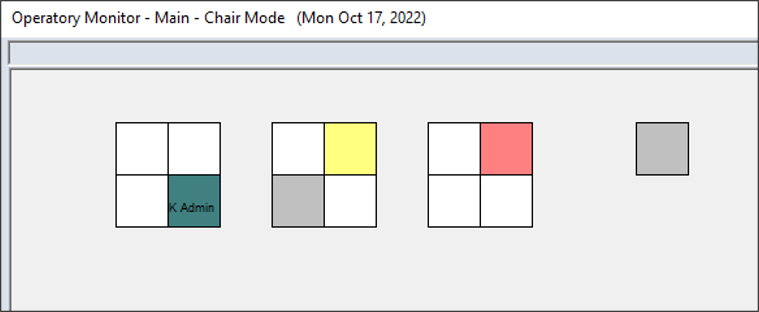
Operatory Modes
The Operatory Monitor can run in one of two modes:
-
Graphic mode: This view displays the configured clinic layout for the selected clinic and the current activity at each chair.
Note: A chair can be divided when two appointments are scheduled within a time range. Time ranges are managed from the Operatory Monitor Options window > __ Minutes Before Current Time and __ Minutes After Current Time fields.
-
Text mode: This view displays a list of current appointments and the associated patient and provider statuses.
Operatory Monitor Colors
There are two types of status that can be indicated by color in the Operatory Monitor:
-
Patient Statuses: The text color for each patient displayed in the Operatory Monitor can change depending on their status:
-
Green: This indicates the patient has not arrived for the appointment.
-
Purple: This indicates the patient has been signed in for the appointment.
-
Red: This indicates the patient has been checked in for the appointment.
-
Black: This indicates the patient has been seated for the appointment.
-
Gray: This indicates the patient has been checked out from the appointment.
-
Provider Statuses: Provider statuses are indicated by chair background colors. The colors and descriptions are managed from Maintenance > Scheduler >Clinical Notification States.
To use the Operatory Monitor:
-
Open the Scheduler module and click the Operatory Monitor ( ) icon to display the Operatory Monitor window. ) icon to display the Operatory Monitor window.
Tip: You can also access the Nav Panel > Clinical Management section > drop-down arrow ( ) > select the Operatory Monitor sub-menu to display the Operatory Monitor window. ) > select the Operatory Monitor sub-menu to display the Operatory Monitor window.
Note: Some workstations such as wall-mounted displays may be set up to open directly to the Operatory Monitor on launch and display the Operatory Monitor all the time. This is managed from the Operatory Monitor Options window > Mounted Mode field and the Desktop Settings window > Startup Module (Override) field.
-
(Optional) Configure the display options to filter the results.
Operatory Monitor Fields
| Group |
Select a group from the drop-down list.
Tip: You can also select All Clinic Groups to not filter based on group.
|
| Clinic
|
Select a clinic from the drop-down list.
|
| Session |
Select a clinic session from the drop-down list.
Note: This field only displays if the Operatory Monitor Options window > Contents Display Based on field is set to Session Time.
|
|
Monitor |
Select a radio button to control how colors display in the Operatory Monitor:
-
Patients: Displays a text color to indicate the patient’s appointment status.
-
Providers: Displays the text in black and a background color to indicate the provider’s status as indicated by their set clinical notification state for the selected chair.
-
Both: Displays both a background color and a text color to indicate the provider’s status and the patient’s appointment status.
|
| Display |
Select a following radio button to determine the display mode:
|
-
Review as necessary.
Tip: You can use the + / - buttons or slide bar to zoom in or out.
-
To perform another task, complete any of the following:
Set Clinical Notification States
-
Right-click a chair and select a listed clinical notification state.
The color of the notification displays on the Operatory Monitor to signal that you require assistance.
Tip: It also displays on the status bar and in FacultyAccess.
Clear Clinical Notification States
-
Right-click a chair and select Clear Notification.
The notification no longer displays on the Operatory Monitor and the clear notification color displays on the status bar and in FacultyAccess.
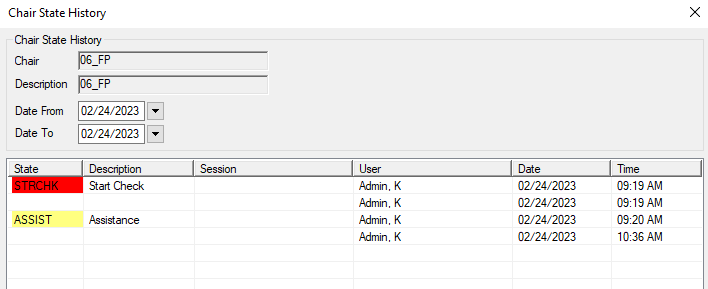
View Notification History
-
Right-click a chair and select Show Notification History… to display the Chair State History window.
-
Review as necessary.
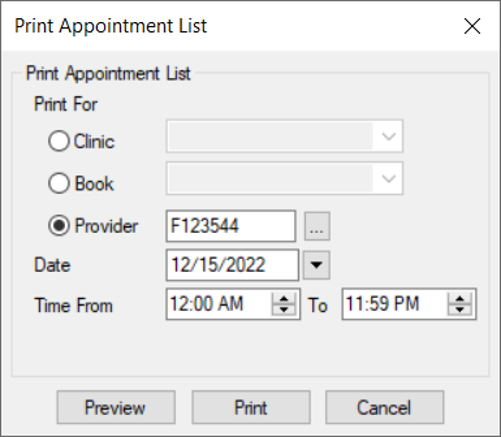
Print the Appointment List
When necessary, you can generate and print the Appointment List report.
Note: The Appointment List report uses the appoint.rpt file in your SReports folder.
-
Open the Scheduler module and click the Print List ( ) icon to display the Print Appointment List window. ) icon to display the Print Appointment List window.
-
Complete the fields as necessary.
| Print For |
Select a radio button to indicate whether you want to run the report based on clinics, books, or providers:
-
Clinic: If selected, select a clinic or All Clinics from the enabled drop-down list.
-
Book: If selected, select a book or All from the enabled drop-down list.
-
Provider: If selected, click the ellipsis to display the Providers List window and select a provider.
|
| Date |
The date defaults to today’s date.
If necessary, you can select another date from the calendar drop-down.
|
| Time From / To |
Click the arrow buttons to set the start and end times for the report.
|
-
(Optional) Click Preview.
-
Click Print.
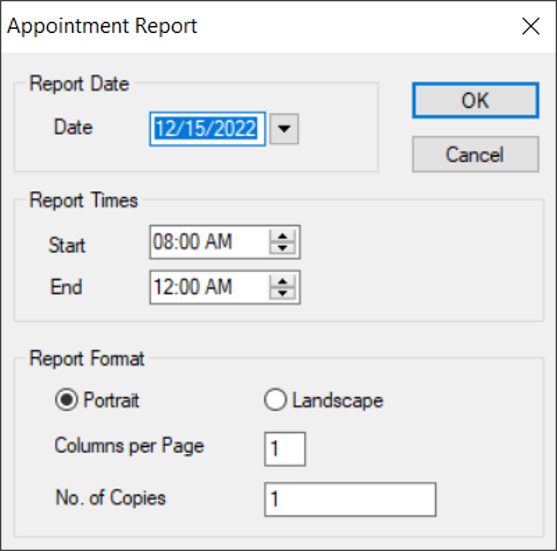
Print View
When necessary, you can print the contents of the Scheduler module > Active tab as the Appointment report.
Note: The Appointment report uses the apptform.rpt file in your SReports folder.
-
Open the Scheduler module and click the Active tab.
-
click the Print View ( ) icon to display the Appointment Report window. ) icon to display the Appointment Report window.
Note: When working in any other Scheduler tab, the Print View () icon saves/prints a screen shot of the current tab.
-
Complete the fields as necessary and click OK.
| Date |
The date defaults to today’s date.
If necessary, you can select another date from the calendar drop-down.
|
| Start / End |
Enter start and end times for the report.
|
| Portrait / Landscape |
Select a radio button indicate the page orientation.
|
| Columns per Page |
Enter a value to indicate how many columns will display in the report.
Note: axiUm can display up to eight columns in portrait format and 10 columns in landscape format.
|
| No. of Copies |
Enter a value to indicate the number of copies to print. |
|